
 Fences
 Gates
Gates Signage & Boards
 Car Parking Shades
 Block and Foundation
 Spare Parts
How to Install Welded Mesh Fence Panels: Step-by-Step UAE Guide

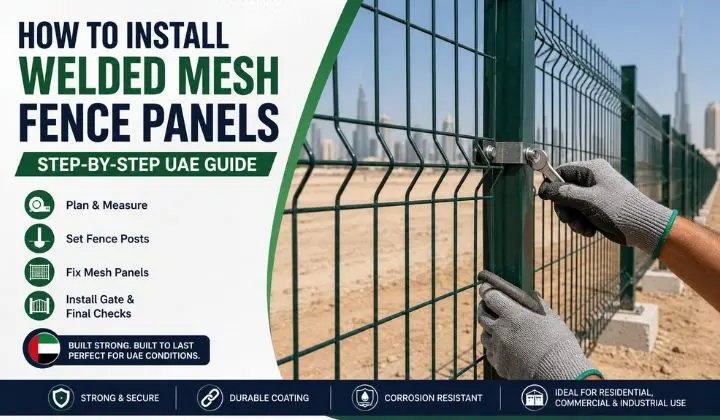
Installing welded mesh fence panels correctly starts with good planning and accurate post installation. The basic process is to measure the fence line, mark the post locations, prepare stable foundations, install and align the posts, and then fix each rigid mesh panel with the correct hardware.
Unlike flexible wire mesh rolls, welded mesh fence panels are rigid sections. They are normally positioned between supporting posts and secured with suitable fence clamps, brackets, bolts, or other system-specific fixings. The exact method can vary with the panel design and site conditions.
For UAE projects, material selection also matters. Galvanized steel and protective coatings can help the fence handle outdoor exposure, including heat, moisture, and sand. Vertex Fence lists galvanized and PVC-coated welded mesh options for industrial, commercial, infrastructure, warehouse, and construction applications across the UAE.
What Are Welded Mesh Fence Panels?
Welded mesh fencing is made by joining steel wires together at their intersections to form a rigid mesh panel. Because the wires are welded, the finished panel keeps its shape and does not behave like a flexible mesh roll.
A typical system consists of:
- Welded mesh fence panels
- Steel or GI fence posts
- Fence clamps or brackets
- Bolts, nuts, and other fixing hardware
- Concrete or another suitable foundation system
The panel’s mesh size, wire thickness, height, and width can vary depending on the project. Vertex Fence, for example, lists custom mesh sizes, wire thicknesses, panel heights, and standard or custom panel widths.
Welded Mesh Panels vs Flexible Wire Mesh Rolls
This difference is important when planning an installation.
A welded mesh panel is a rigid fence section. It is normally lifted into position, aligned with the posts, and secured using the correct fixing system.
A flexible wire mesh roll is different. It may need to be unrolled, pulled into position, and tensioned with suitable wires or tools.
Because of this, a guide written for a rolled wire fence should not automatically be followed for rigid welded panels. For welded mesh panels, the main concerns are post alignment, correct spacing, panel positioning, and secure fixing.
What You Need Before Installing Welded Mesh Fence Panels
Having the right materials and tools ready before starting can prevent delays and measurement mistakes.
Materials and Fixing Hardware
The exact materials depend on the fence system, but a typical installation may require:
- Welded mesh fence panels
- GI or steel fence posts
- Fence clamps
- Fence brackets
- Bolts, nuts, and washers
- Post caps
- Concrete or suitable foundation material
- Gate and gate hardware, if required
- Touch-up coating where appropriate
The fixing hardware should match the panel and post system. Do not assume that one type of clamp or bolt works for every welded mesh fence.
For higher-security systems, the fixing method may also be designed to make unauthorized removal more difficult.
Tools and Safety Equipment
Common tools include:
- Measuring tape
- Spirit level
- String line
- Stakes or pegs
- Post-hole digger or auger
- Shovel or spade
- Hammer or mallet
- Spanner or suitable wrench
- Drill, where required by the fixing system
- Work gloves
- Safety glasses
- Protective footwear
Large or complex projects may need additional equipment depending on the ground and foundation work.
How to Install Welded Mesh Fence Panels
The installation should be completed in a planned sequence. Rushing the post stage can create problems later because even a small alignment error can make panel installation difficult.
Step 1 — Measure and Plan the Fence Layout
Start by measuring the complete fence line.
Do not order panels or start digging post holes based only on an estimated distance. First determine the actual length of the boundary and identify anything that will affect the layout.
Check for:
- Total boundary length
- Corners
- End points
- Gate openings
- Changes in direction
- Sloping or uneven ground
- Existing walls or structures
- Drainage areas
- Possible underground services
You should also decide where the gate will be located before setting the posts.
This matters because a gate needs its own supporting posts and enough clearance to open and close correctly.
A simple planning sequence is:
Measure the boundary → identify gates and corners → determine panel quantity → plan post locations → check ground conditions.
For a large commercial or industrial site, a proper site survey is worth doing before installation begins.
Step 2 — Mark the Fence Line and Post Locations
Once the layout is planned, mark the fence line using stakes and a string line.
The string provides a simple visual reference that helps keep the posts in a straight line.
Mark:
- Corner posts
- End posts
- Gate posts
- Intermediate posts
At this stage, check the measurements again.
It is much easier to correct a marking mistake before digging than after the concrete has been placed.
Why is a straight fence line important?
The posts form the structure that supports the panels. If one post is noticeably out of line, the problem can become visible across several connected panels.
A good installation therefore checks the line at more than one point rather than assuming that the first and last posts are enough.
Step 3 — Determine the Correct Post Spacing
Fence post spacing should be based on the actual panel and post system.
There is no single spacing measurement that is correct for every welded mesh fence.
The required spacing can depend on:
- Panel width
- Post profile
- Fence height
- Fixing system
- Corner arrangement
- Gate locations
- Ground conditions
- Manufacturer specifications
For example, Vertex Fence lists standard and custom panel widths as well as GI and steel post options, showing why the panel and post dimensions need to be considered together.
How Far Apart Should Welded Mesh Fence Posts Be?
The best approach is to start with the actual panel width and the manufacturer’s recommended fixing arrangement, then position the posts so the panel fits correctly between them.
Do not simply use a general measurement from another fence project.
This is especially important around gates and corners, where normal panel spacing may need to change.
Step 4 — Prepare the Post Foundations
After marking the post locations, prepare the post holes or another approved foundation system.
The foundation needs to provide enough stability for the fence and the conditions at the site.
The required foundation can depend on:
- Fence height
- Post size
- Soil type
- Wind exposure
- Ground conditions
- Fence design
- Project requirements
For this reason, there should not be one universal hole depth or concrete volume for every welded mesh fence.
What Should You Check Before Concreting?
Before setting a post, check:
- Is the location correct?
- Is the post the correct type and size?
- Is the hole suitable for the project?
- Is the post aligned with the fence line?
- Is there enough space for the panel and fixing hardware?
For difficult soil, slopes, high fences, or large security projects, foundation requirements should be assessed by a suitably experienced professional.
Step 5 — Install and Align the Fence Posts
The posts are the main support structure for the panels, so this stage deserves careful attention.
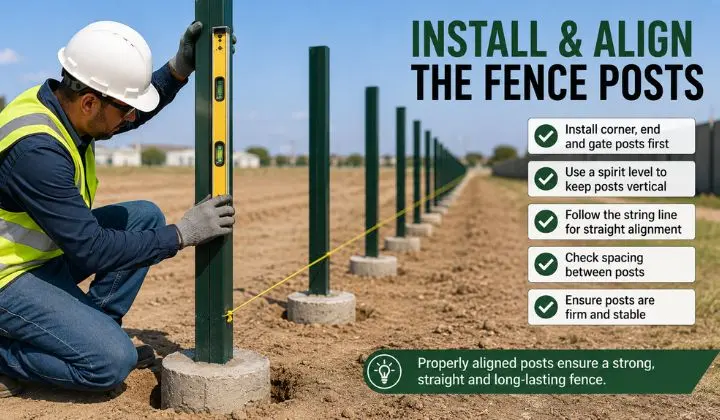
Start with important structural points such as corner, end, and gate posts. Then install the intermediate posts according to the planned layout.
Use a spirit level to check that each post is vertical.
At the same time, use the string line to check that the post remains on the planned fence line.
Check three things:
Vertical:
The post should stand straight.
Horizontal alignment:
The posts should follow the planned fence line.
Spacing:
The distance should work with the selected panels and fixing system.
If a post is leaning or incorrectly positioned, fix the problem before the foundation becomes difficult to adjust.
Step 6 — Allow the Foundations to Cure
Once the posts have been installed and the foundation material placed, give the foundation enough time to develop the required stability before loading the posts with panels.
The correct curing time depends on:
- Concrete mix
- Weather
- Temperature
- Foundation size
- Product instructions
- Project requirements
In hot UAE weather, concrete can behave differently from cooler conditions, so following the concrete manufacturer’s guidance is better than relying on a single fixed waiting period.
Why does curing matter?
A welded mesh panel creates a load on its supporting posts. If the foundation has not gained enough strength, moving or loading the post too early can affect its alignment and stability.
The goal is simple:
Stable foundation → stable post → properly aligned panel.
Step 7 — Position and Secure the First Panel
Once the posts are stable, begin with the first welded mesh panel.
Position the panel between the supporting posts and check its height before tightening the fixings.
Pay attention to:
- Panel height
- Ground clearance
- Vertical alignment
- Horizontal alignment
- Fixing-point position
- Distance from nearby structures
Use the appropriate fence clamps, brackets, bolts, or dedicated panel fittings for the selected system.
How Should the First Welded Mesh Panel Be Aligned?
The first panel acts as a reference for the rest of the fence.
Before fully tightening the fixings, check it with a spirit level and confirm that it follows the planned fence line.
If the first panel is installed incorrectly, the error can continue into the next sections.
So take a little extra time here.
Measure → position → level → fix → recheck.
Step 8 — Secure the Panel to the Posts
After the panel is correctly positioned, secure it to the posts using the specified fixing system.
Depending on the fence design, this may include:
- Clamps
- Brackets
- Bolts and nuts
- Clips
- Other dedicated panel fixings
Do not overtighten hardware if doing so could damage the protective finish or deform the panel.
The connection should be firm enough to hold the panel securely while keeping the panel and post in their intended position.
For a security-focused fence, the fixing method should also be selected with the project’s access and tampering requirements in mind.
Install and Align the Remaining Panels
After the first panel is securely fixed, continue along the fence line one section at a time.
Use the first correctly installed panel as your reference. Position the next welded mesh fence panel between the posts and check that its top line, height, and ground clearance match the previous section.
Before fully tightening each connection:
- Check the panel is level.
- Check the posts are still vertical.
- Confirm the panel is sitting at the planned height.
- Make sure the fixing points are correctly positioned.
- Check that there are no unwanted gaps.
This process may seem slow, but it helps prevent small alignment errors from becoming obvious across the finished fence.
Check Panel Alignment as You Go
Do not wait until every panel is installed before checking the fence.
After each section, step back and look along the fence line. This can reveal:
- Leaning panels
- Uneven top edges
- Changing ground clearance
- Incorrect post positions
- Loose fixing points
Fixing these problems while the installation is in progress is usually easier than correcting them at the end.
How to Join Welded Mesh Fence Panels
Joining panels correctly helps create a continuous and secure fence line.
The exact connection method depends on the design of the panels and posts. Common options can include fence clamps, brackets, bolts, clips, or other purpose-designed fixing hardware.
Panel-to-Post Connection
The most common installation method is to secure each panel to its supporting post.
The panel should sit in the correct position before the fixing hardware is tightened. Make sure the connection does not force the panel out of alignment.
Panel-to-Panel Connection
If the fencing system is designed to connect panels directly, follow the manufacturer’s recommended joining method.
Do not assume that overlapping panels, cable ties, or other improvised methods are suitable for every rigid panel system.
For a security fence, the connection should be strong, neat, and appropriate for the expected use.
Corner Connections
Corners need extra attention because the fence changes direction.
A correctly positioned corner post should provide a solid fixing point for the panels coming from both directions. Check the angle before permanently tightening the connections.
Poor corner planning can create:
- Large gaps
- Misaligned panels
- Weak fixing points
- An uneven appearance
Do Welded Mesh Fence Panels Need to Be Stretched?
Rigid welded mesh fence panels normally do not need to be stretched like flexible wire mesh rolls.
This is an important difference between two types of fencing.
A flexible mesh roll may require tensioning to remove slack and keep the mesh tight. A rigid welded panel already holds its shape, so the usual installation process is to position, align, and securely fix it to the posts.
If you are installing a flexible welded wire mesh roll, the manufacturer’s system may require tension wire, strainers, or other tensioning tools.
For rigid panels, using a fence stretcher or trying to force the panel into tension can be unnecessary and may damage the panel or fixing system.
Can Welded Mesh Fence Panels Be Installed on Uneven Ground?
Yes, but the installation method needs to be planned around the site’s slope and ground level.
Uneven ground can affect:
- Panel height
- Ground clearance
- Post positioning
- Security gaps
- Fence appearance
- Gate operation
Two common approaches are stepped and sloped installation.
Stepped Installation
With a stepped layout, each panel section remains relatively level while the fence changes height from one section to the next.
This can work well where the ground changes noticeably over a short distance.
The installer needs to plan the height changes carefully so that large gaps do not appear underneath the panels.
Sloped Installation
Where the panel system allows it, the fence can follow the natural slope of the ground.
This may provide a smoother appearance, but the panel and post system must be suitable for the required angle.
For steep or complicated sites, professional planning can help prevent problems with panel alignment, foundations, gates, and security gaps.
Welded Mesh Fence Installation Considerations in the UAE
Welded mesh fencing can be used for many UAE applications, including residential boundaries, warehouses, factories, construction sites, commercial properties, and larger perimeter projects.
However, outdoor fencing in the UAE needs to be selected with the local environment in mind.
Heat, Dust and Humidity
High temperatures, dust, humidity, and outdoor exposure can affect fencing components over time.
The material specification and protective finish should therefore match the location and intended use.
Coastal and Corrosive Environments
Properties near the coast can have greater exposure to moisture and salt-laden air.
For these locations, corrosion resistance and the quality of the protective coating should be considered when selecting the fencing system.
Galvanized and Coated Steel
Galvanized steel provides a protective zinc layer that helps reduce corrosion.
Additional finishes, such as PVC or powder coating, may also be used depending on the product specification and project requirements.
If the panel or post is cut, drilled, or scratched during installation, the exposed area should be addressed using an appropriate repair method recommended for the coating system.
For UAE projects, choosing the right specification is just as important as installing the fence correctly.
Common Welded Mesh Fence Installation Mistakes
Even good-quality fencing can perform poorly when installation details are overlooked.
Using the Wrong Post Spacing
Posts should be planned around the actual panel dimensions and fixing system.
Incorrect spacing can leave a panel too tight, too loose, or difficult to secure.
Installing Posts Out of Alignment
A post that is leaning or outside the planned fence line can affect several panels.
Always check posts with a spirit level and string line before the foundation becomes difficult to adjust.
Using Weak Foundations
The posts carry the panels and transfer loads into the ground.
A foundation that is not suitable for the fence height, soil, or site conditions can affect the stability of the entire fence.
Tightening Fixings Too Much
Over-tightening can damage coatings, deform components, or affect the fixing system.
Use the correct hardware and tighten it according to the system requirements.
Ignoring Uneven Ground
Trying to install every panel at exactly the same ground height on a sloping site can create unwanted gaps or alignment problems.
Plan the fence profile before installing the posts.
Damaging the Protective Coating
Scratches and exposed steel can become points where corrosion starts.
Inspect the panels and posts after installation and repair coating damage using a suitable method.
How to Maintain Welded Mesh Fence Panels
One benefit of welded mesh fencing is that it generally requires relatively little maintenance when the correct material and coating are selected.
Still, regular checks can help identify small problems before they become larger ones.
Inspect the fence periodically for:
- Loose clamps or bolts
- Damaged panels
- Bent wires
- Damaged coating
- Rust or corrosion
- Moving posts
- Gate alignment problems
- Accumulated dirt or debris
Pay particular attention to gates and other moving components because they experience more regular use.
If damage is found, repair or replace the affected component according to the fencing system’s specifications.
Frequently Asked Questions
Can welded mesh fence panels be cut to fit around corners or obstacles?
Yes, some welded mesh panels can be cut where the system allows it, but the cut should be carefully planned so the panel remains structurally suitable. Any exposed steel created by cutting should also receive the appropriate corrosion protection.
How long should you wait before attaching welded mesh panels after concreting the posts?
The required waiting period depends on the concrete mix, weather, foundation design, and project requirements. Follow the concrete manufacturer’s guidance and make sure the posts are stable enough before adding the panels.
What should you do if a welded mesh fence panel does not fit between two posts?
First check the measurements, post spacing, panel width, and post alignment. Do not force the panel into position; identify the cause of the mismatch and correct the installation or use an approved adjustment method for the specific system.
How do you prevent rust or coating damage after installing welded mesh fence panels?
Inspect the fence for scratches, exposed steel, or damaged coating after installation. Repair affected areas using a suitable coating or repair product recommended for the original galvanized, PVC, or powder-coated finish.
Is professional installation necessary for welded mesh fence panels?
A small and straightforward project may be manageable with suitable skills and equipment, but professional installation is often a better choice for large perimeters, security fencing, gates, difficult ground, or complex foundations. Proper installation is especially important when the fence forms part of a commercial or industrial security system.
Final Thoughts
A successful welded mesh fence installation depends on more than simply attaching panels to posts. The fence line needs to be planned carefully, posts need suitable foundations, and every panel needs to be aligned and securely fixed.