
 Fences
 Gates
 Signage & Boards
 Car Parking Shades
 Block and Foundation
 Spare Parts
How to Measure a Site for Fence Installation in UAE

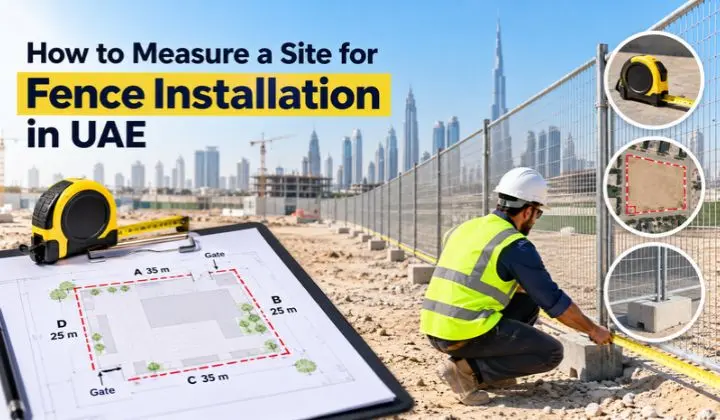
Accurate measurements are the first step towards a successful fence installation. Whether you need fencing for a construction site, commercial property, industrial facility, or private plot, correct measurements help you estimate materials, plan access points, and avoid unnecessary costs.
A proper fence measurement plan includes more than the total boundary length. You also need to record gate openings, corners, existing walls, ground levels, and the type of fence you want to install.
This guide explains how to measure a site for fence installation in simple steps. You will learn how to calculate the fence length, account for gates, and prepare the measurements needed to estimate panels and posts for a project in the UAE.
What Do You Need to Measure a Fence Installation Site?
Before measuring the site, collect the right tools and confirm where the fence will be installed. Preparing these details first can save time and reduce errors during the project.
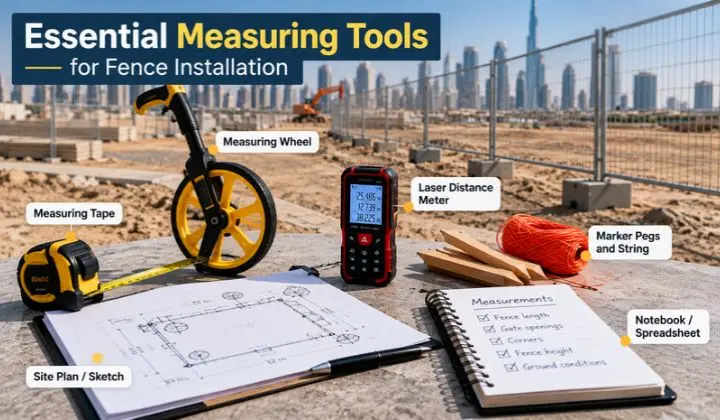
Essential Measuring Tools
You do not need expensive equipment for every fencing project. The tools you need depend on the site size, layout, and level of accuracy required.
- Measuring tape: Useful for short fence runs, corners, and gate openings.
- Measuring wheel: Helps measure longer distances across open areas.
- Laser distance meter: Can make distance checks easier when there is a clear line of sight.
- Site sketch or plan: Helps you record measurements in the correct places.
- Marker pegs and string: Useful for marking the proposed fence line where permitted.
- Notebook or spreadsheet: Helps you organise measurements, gate widths, and site details.
Use linear metres as your main unit throughout the project. If your site plan or supplier gives measurements in feet, convert them before adding the figures. For example, 100 feet equals 30.48 metres.
For a large or irregular site, measure important distances more than once. Remember that a measuring tool is only useful when you follow the correct measurement line and record the results carefully.
Confirm Property Boundaries and the Intended Fence Line
Before measuring, identify the legal property boundary and the exact line where the fence is planned. These two lines may be different if the project includes a setback, an existing wall, or a shared boundary.
Do not assume that an old fence, wall, or road edge marks the correct property line. If the boundary is unclear, check the available site plan or contact a qualified surveyor or the relevant authority.
You should also check whether your project requires approval from the relevant UAE authority, property manager, or developer. Requirements can vary by location and project type, so avoid relying on a general fence-height rule for every site.
How to Measure a Site for Fence Installation Step by Step
Follow the same process for each part of the site. This makes your perimeter fence measurement easier to check and helps you prepare a more accurate fence material estimate.
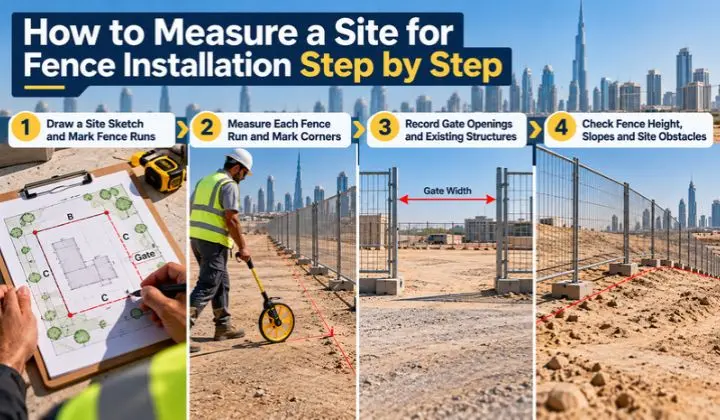
Step 1: Draw a Site Sketch and Mark Fence Runs
Start with a simple top-down drawing of the area you want to enclose. It does not need to be a professional drawing, but it should show the site’s shape and the planned fence line.
Mark every straight section as a separate fence run. Label the sections A, B, C, and D, or use another clear system. Then mark the corners, endpoints, gates, existing walls, and areas where new fencing is not required.
For example, an L-shaped plot has more direction changes than a simple rectangle. Recording each section separately helps you avoid missing a short section or counting the same distance twice.
Keep the sketch beside your measurements. A list of numbers without a clear location for each measurement can cause confusion when you request a fencing quote.
Step 2: Measure Each Fence Run and Mark Corners
Measure each straight section along the planned fence line. Record the distance in metres and write it beside the correct label on your sketch.
For a rectangular plot, measure all four sides rather than assuming that opposite sides are exactly equal. Even small differences can affect the final estimate.
For an irregular plot, measure every section between corners or changes in direction. Check that the adjoining runs meet at the correct points and that no short return section has been missed.
At this stage, record the full planned fence line. You will account for gates, existing walls, and other areas that do not need new panels when calculating the final length.
Step 3: Record Gate Openings and Existing Structures
Mark every entrance on your sketch and record the required clear opening. This may include a pedestrian gate, vehicle gate, or wider access point for construction equipment.
The gate opening width is not always the same as the overall width of a gate leaf or the space needed for its posts and hardware. Confirm the required clear passage and the dimensions specified for the selected gate system.
Also record existing walls and permanent barriers. Do not subtract a wall automatically just because it is close to the proposed fence line. First, confirm that the wall will serve as the boundary and that no new fencing is needed along that section.
To estimate the length needed for new fence panels, subtract only the sections where panels will not be installed. Keep gates and their posts, hinges, locks, and other hardware in a separate part of your estimate.
Basic formula:
Net fence length = Total planned fence-line length − Gate openings − Existing sections where new fencing is not required
This gives you a preliminary length for the new fence panels. The final layout must still account for the selected fence system, corners, and installation requirements.
Step 4: Check Fence Height, Slopes and Site Obstacles
Length is only one part of a fence material estimate. You must also record the required fence height and the condition of the ground.
Walk along the planned fence line and look for slopes, dips, raised areas, drains, paved surfaces, and other obstacles. Record these details on your sketch so the installer can assess them before deciding on the final layout.
On sloping ground, measure the planned run horizontally for the site-length calculation, then record the slope and changes in ground level separately. Measuring a tape directly over uneven ground can produce a different result from the horizontal distance.
The final fence may need a stepped layout or a sloped layout. The right approach depends on the fence design, the ground conditions, and the required clearance beneath the panels.
Before digging begins, arrange the required checks for underground utilities and private services. Do not assume that a public utility locator will identify every private cable, pipe, or site service.
How to Calculate the Total Fence Length
Once you have measured every fence run, add the figures to calculate the total planned length. Then subtract gate openings and existing sections where new fencing is not required.
This gives you a starting point for your fence length calculation. Panel and post quantities must be estimated separately because they depend on the chosen fence system and site layout.
Calculate the Perimeter of a Rectangular Plot
For a rectangular plot, calculate the perimeter by adding the lengths of all four sides.
Formula:
Perimeter = Length + Width + Length + Width
For example, suppose a site is 30 metres long and 20 metres wide.
- Two longer sides: 30 + 30 = 60 metres
- Two shorter sides: 20 + 20 = 40 metres
- Total perimeter: 60 + 40 = 100 metres
The planned fence line is 100 metres before you account for gates or sections that will not need new fencing.
This formula works for a rectangle. For an irregular plot, measure each section of the planned fence line and add the individual distances instead.
Measure Irregular Plots and Calculate Net Fence Length
For an irregular site, label each fence run on your sketch and add all the measured distances.
For example, suppose the planned runs measure 18 m, 24 m, 12 m, 9 m, 15 m, and 22 m.
Total planned length = 18 + 24 + 12 + 9 + 15 + 22 = 100 metres
If the layout includes a 4-metre pedestrian gate and a 6-metre vehicle gate, the preliminary net length for fence panels becomes:
Net fence length = 100 − 4 − 6 = 90 metres
This calculation assumes that the original 100-metre measurement includes both gate openings. If you have already measured only the sections between the gates, do not subtract the openings again.
The gates and their support posts still need to be included in the project plan, even though their openings are excluded from the panel length.
Account for Gate Openings and Existing Walls
Before finalising your figures, review the sketch and confirm which sections need new fencing. Check every gate width, existing wall, permanent barrier, and area where the project does not require new panels.
For example, if a planned fence line is 80 metres long and includes a 5-metre gate opening, the preliminary net length is 75 metres, provided the gate opening was included in the original measurement.
For large construction or industrial sites, a run-by-run measurement sheet is often more useful than a single perimeter figure. It helps the supplier understand the layout and review any changes before materials are ordered.
How to Calculate Fence Panels and Posts
After calculating the net fence length, prepare a fence material estimate. This estimate includes the panels, posts, gates, connectors, and supports needed for your project.
The exact quantities depend on the fence type, panel dimensions, fixing method, and site layout. A temporary construction fence may need different components from a permanent metal fence.
Calculate Panel Quantities Using Effective Panel Width
To estimate the number of fence panels, divide the net fence length by the effective width covered by one installed panel.
Formula:
Number of panels = Net fence length ÷ Effective panel width
The effective panel width is the distance covered by a panel after accounting for how it connects to the next panel. It may differ from the panel’s nominal width, so check the manufacturer’s specifications before calculating the quantity.
For example, suppose your net fence length is 90 metres and each panel covers 2.5 metres when installed.
90 ÷ 2.5 = 36 panels.
This gives you a preliminary estimate of 36 panels for a straight layout. If the result is not a whole number, round up for an initial estimate. The final quantity may change because of corners, gate positions, cut panels, and the actual installation layout.
An accurate fence panel calculation starts with the usable coverage of the selected product, not just the width shown in its name or description.
Plan Post Positions for Straight Runs, Corners and Gates
Fence post spacing depends on the selected fence system. Some panels connect directly to posts, while other systems use different fixing methods. There is no single spacing rule that applies to every fence.
For an initial estimate, check the effective panel width and the manufacturer’s recommended layout. Mark the required corner posts, end posts, and gate posts on your site sketch.
A straight fence run may need posts at its ends and at the panel connections. A layout with several corners or gates can require a different arrangement. Some systems may also allow adjoining panels to share a post.
Do not calculate the final post quantity from the panel count alone. Mark the post positions on the fence layout and confirm the required spacing and fixing details before ordering.
Estimate Temporary Fence Supports and Accessories
A temporary fence at a construction site may need more than panels and posts. Depending on the system, the required components can include fence support blocks, braces, panel connectors and couplers, clamps, support pipes, and gate hardware.
For example, a temporary fencing system that uses concrete support blocks needs compatible blocks at the positions specified for that system. The exact number depends on the product design and installation instructions.
Wind exposure, fence height, ground conditions, and the length of each run can also affect support requirements. Ask the supplier to confirm the suitable accessories instead of using the same quantities for every site.
Worked Example: Measuring a Construction Site in UAE
Consider a construction site in the UAE that needs temporary fencing around its planned boundary. The following figures are illustrative and are not measurements from an actual project.
Calculate the Net Fence Length in Metres
Suppose the site has four planned fence runs:
| Fence run | Measured length |
| Run A | 35 m |
| Run B | 25 m |
| Run C | 35 m |
| Run D | 25 m |
| Total planned length | 120 m |
The site also has a 4-metre access opening where fence panels will not be installed.
Net fence length = 120 − 4 = 116 metres
This calculation assumes the original 120-metre measurement includes the access opening. If you measured only the sections between the opening, do not subtract it again.
Estimate Panel Quantities Using Actual Product Dimensions
Now assume the selected temporary fence panel has an effective installed coverage of 2.5 metres.
Panel estimate = 116 ÷ 2.5 = 46.4 panels
Round up to 47 panels for a preliminary estimate. The final arrangement may require adjustments because the panels must fit the actual runs, corners, and gate positions.
For a real construction site fencing project, confirm the selected product’s dimensions and fixing method. The overall panel width may not equal its effective installed coverage.
You can review the PPGI Continuous Fence range and check whether the product suits your project requirements. If you need temporary fencing with concrete bases, review the RCC Blocks for Temporary Fencing range as well. Confirm product compatibility and quantities before placing an order.
Can You Measure a Fence Using Google Maps or an Online Calculator?
Yes. Digital tools can help you prepare an early estimate. A map measurement feature may help you trace a visible boundary, while a fence measurement calculator can help add distances or estimate panel quantities.
However, satellite images may be outdated, property lines may not be visible, and map measurements may not match the exact fence line on the ground. Buildings, trees, walls, and changes in ground level can also make the boundary difficult to trace.
Use Google Maps or a fence calculator for preliminary planning, not as a replacement for on-site measurements. Before requesting a final quote, check the measurements against the site plan and the actual fence line.
An online fence measurement tool is most useful when you enter verified measurements. A fence estimate template can also help you record each run, gate opening, fence height, panel type, and special site condition.
If you need to measure in feet, convert the results to metres before adding them to a measurement sheet that uses metric units. Keeping one consistent unit makes the calculations easier to check.
Common Fence Measurement Mistakes to Avoid
Small measurement errors can affect the number of panels, posts, and accessories required. Check these common mistakes before ordering materials.
- Using the wrong boundary: Confirm the intended fence line rather than assuming an existing wall or old fence marks the legal property boundary.
- Forgetting gate openings: Record every opening and avoid subtracting the same gate twice.
- Using nominal panel width: Calculate quantities using the effective coverage specified for the selected fence system.
- Ignoring uneven ground: Record the ground profile, slopes, and changes in level separately from the horizontal run measurements.
- Guessing post spacing: Follow the manufacturer’s specifications and account for corners, endpoints, and gates.
- Overlooking existing structures: Confirm which walls or barriers will replace new fencing before calculating the net length.
- Ordering without checking the layout: Review panel arrangements, cut sections, connectors, and supports before finalising quantities.
- Skipping utility checks: Confirm the location of underground services before digging post holes or installing ground supports.
Avoid adding an arbitrary percentage of extra material to every project. The right allowance depends on the fence system, the site layout, and whether cut panels can be reused.
Fence Measurement Checklist Before Requesting a Quote
Use this checklist to make sure your measurements are ready to share with a supplier or installer.
- Confirm the property boundary and intended fence line.
- Prepare an overhead sketch of the site.
- Record every fence run in linear metres.
- Mark corners, endpoints, entrances, and gate openings.
- Note existing walls and sections where new fencing is not required.
- Record the required fence height and selected fence type.
- Identify slopes, obstacles, and other ground conditions.
- Calculate the total planned length and net fence length.
- Estimate panels using the correct effective panel width.
- Confirm post positions, supports, and accessories with the manufacturer.
- Arrange the required underground utility checks and local approvals.
- Share your sketch and measurement sheet when requesting a quote.
Completing these checks helps the supplier understand your requirements and identify details that need confirmation before materials are ordered.
Frequently Asked Questions
Can You Calculate Fence Length From Plot Area Alone?
No. Plot area tells you how much land the site covers, but it does not give you the exact boundary length. You need the plot’s shape and dimensions, or measurements of the intended fence line, to calculate the required length.
What Information Should You Send a Fence Supplier for an Accurate Quote?
Share your site sketch, individual run measurements, total fence length, required height, fence type, gate openings, and details of any slopes or obstacles. Also mention how the fence will be used so the supplier can check which panels, posts, supports, and accessories are suitable.
How Do You Measure a Fence When Replacing Existing Panels?
Measure the usable space between the existing posts and check the height and width of each section. Inspect the posts and fixing method too, because replacement panels may not fit correctly if the original system uses different dimensions or connectors.
What Is the Difference Between Fence Panel Width and Post-Centre Spacing?
Panel width is the physical width of the panel, while post-centre spacing is the distance between the centre points of two posts. These measurements can differ because of the way panels attach to posts, so check the selected system’s installation dimensions before calculating quantities.
Can a Fence Measurement Be Finalised Before Choosing the Fence System?
You can measure the site and prepare an initial length estimate before choosing a fence system. However, final panel quantities, post positions, and accessory requirements should be confirmed after the panel dimensions and fixing method are selected.
Plan Your Fencing Project with Vertex Fence
Accurate site measurements provide a better starting point for planning a fencing project. Record each run, check the gate openings, note the ground conditions, and confirm the effective panel coverage before ordering materials.
For temporary or permanent fencing, compare available products and their specifications with your site requirements. Vertex Fence offers fencing options and related components that you can review while preparing your project estimate.
A clear measurement sheet and a confirmed product layout will help you move from an initial estimate towards a more reliable fencing plan.