
 Fences
 Gates
 Signage & Boards
 Car Parking Shades
 Block and Foundation
 Spare Parts
Chain Link Fence Installation: Step-by-Step Guide

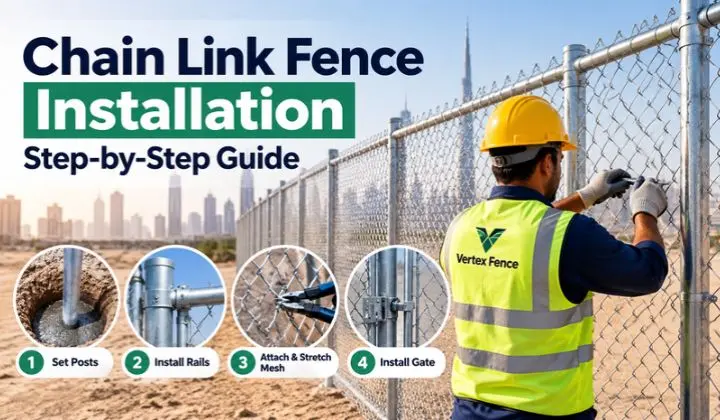
Installing a chain link fence requires careful planning, strong posts, suitable materials, and properly stretched mesh. When installed correctly, a chain link fence can mark property boundaries, protect outdoor areas, and provide security for homes, warehouses, factories, schools, and commercial sites.
This chain link fence installation guide explains the process from measuring the fence line to fitting the gate and checking the finished structure. It also covers common installation problems, material choices for UAE weather, and the factors that affect installation costs.
The right installation method depends on fence height, ground conditions, mesh type, wind exposure, and the manufacturer’s instructions. For large commercial or industrial projects, a qualified fencing contractor can help ensure the fence meets the project’s safety and performance requirements.
What You Need Before Installing a Chain Link Fence
Before starting work, confirm the fence layout, choose suitable materials, and gather the tools needed for the job. Preparing everything in advance helps prevent delays and reduces the chance of mistakes.
Essential Tools and Materials
The tools you need will depend on the fence design and site conditions. Common tools include a measuring tape, string line, marking paint, shovel or post-hole digger, level, pliers, spanners, and suitable cutting tools. A fence stretcher or other approved tensioning tool may also be needed to pull the mesh tight.
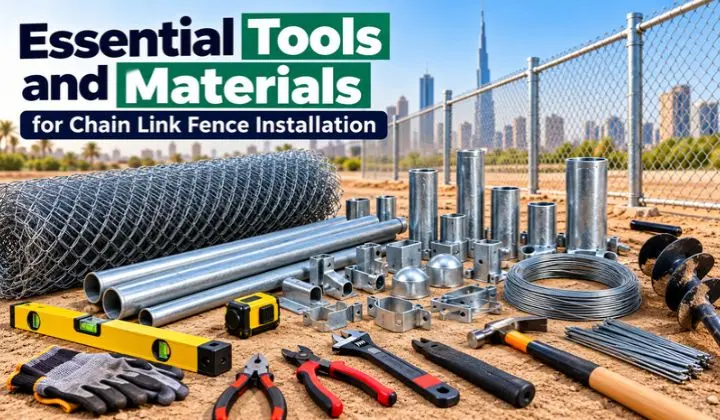
Common materials include:
- Chain link fence fabric (the woven wire mesh)
- Terminal posts, corner posts, and line posts
- Gate posts, hinges, and a gate latch
- Top rails, rail ends, and post caps
- Tension bars, tension bands, and brace bands
- Tie wires and, where required, tension wire
- Concrete or another specified post foundation system
- Suitable fasteners and corrosion-resistant fittings
The correct quantities depend on the fence length, height, number of corners, gate openings, and selected fencing system. Check the supplier’s parts list before buying materials.
Safety also matters. Wear gloves, eye protection, and suitable footwear. Before digging, arrange to identify underground electrical cables, water pipes, and other buried services. Confirm property boundaries and any local permissions that apply to the project.
Choosing the Right Chain Link Fence Type
Not every chain link fence suits every location. The best option depends on the required level of security, appearance, exposure to weather, and maintenance needs.
Galvanized chain link fencing has a zinc coating that helps protect the steel wire from corrosion. It is a common choice for general outdoor use. PVC-coated chain link fencing has an additional plastic coating over the wire, which can provide another protective layer and a different appearance.
Some systems use Galfan-coated wire, which has a zinc-aluminium coating designed to improve corrosion protection. The performance of any coating depends on its specification, quality, installation, and exposure conditions.
For a UAE project, consider heat, strong sunlight, wind, dust, and possible salt exposure near the coast. Ask the supplier to confirm the wire thickness, mesh opening, coating specification, post strength, and suitable fittings for your site.
How to Plan and Measure a Chain Link Fence
Good planning helps you order the right amount of material and place each post correctly. It can also prevent gate problems and reduce unnecessary cutting or waste.
Measuring the Fence Line and Gate Opening
Start by identifying the exact boundary where the fence will stand. Use a tape measure and marking tools to map the fence route. Mark each corner, direction change, end point, and gate opening.
Measure each straight section separately, then add the measurements to find the total fence length. Record the required fence height and the width of every gate opening. Make sure the gate has enough room to open and close without hitting walls, vehicles, or other obstacles.
Do not assume that an existing wall or boundary marker shows the legal property line. Confirm the boundary before digging or installing posts, especially where neighbouring properties are close together.
A simple chain link fence installation diagram can help you record the position of terminal posts, line posts, gates, and corners. Keep the drawing and measurements available during installation.
Calculating Materials and Post Spacing
Your chain link fence material calculation should include the total mesh length, post quantity, top rails, fittings, concrete or other foundation materials, and gate hardware. Allow for the layout and any manufacturer-approved joining method when calculating the mesh requirement.
Chain link fence post spacing is not the same for every project. It depends on the fence height, post strength, mesh specification, ground conditions, wind exposure, and the manufacturer’s system. Use the approved layout rather than choosing spacing by guesswork.
Terminal posts are installed at the ends and at important changes in direction. Line posts support the fence along straight sections. Gate posts must support the gate’s weight and movement, so they may require a different size or foundation from ordinary line posts.
Correct planning also makes it easier to estimate the chain link fence installation cost before work begins.
How to Install a Chain Link Fence Step by Step
The following steps explain the usual installation process. Specific fittings and foundation methods can differ between fence systems, so follow the instructions supplied with your materials.
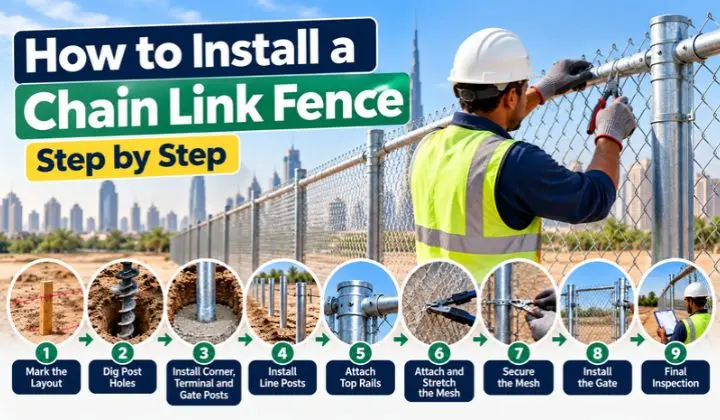
Step 1: Mark the Fence Layout
Mark the fence route with stakes and a string line. Check the alignment, corner positions, and gate openings before digging any holes.
Measure the sections again and confirm that the fence does not cross the agreed boundary. On uneven ground, decide whether the design will follow the slope or use stepped sections. Planning this early helps you choose the correct post positions and mesh arrangement.
Step 2: Dig Post Holes and Prepare the Foundations
Dig the post holes to the depth and width required by the approved fence design. The required dimensions depend on post size, fence height, soil type, wind exposure, and foundation design.
Remove loose material from the holes and prepare the base as specified. Some systems use concrete footings; others may require a different foundation method based on the site and manufacturer’s instructions.
Do not use one depth or hole size for every fence. Weak soil, a tall fence, heavy gates, and exposed locations may require a stronger foundation. Proper drainage is also important because standing water can affect the ground around the posts.
Step 3: Install Corner, Terminal, and Gate Posts
Install the terminal posts first. These include end posts and the main posts at corners or other changes in fence direction. Install the gate posts at the planned opening.
Set each post at the required height and check that it is vertical using a level. Secure it with the specified foundation method and allow the foundation to reach the required strength before applying tension to the fence.
Terminal and gate posts carry important loads. A gate post must support the gate without leaning, while terminal posts help resist the pull created when the mesh is stretched. Correct placement at this stage makes the remaining work easier.
Step 4: Install and Align Line Posts
Once the terminal posts are ready, install the line posts between them according to the approved spacing. Use the string line to keep the posts aligned and check each one for vertical position.
Keep the post tops at the correct level for the planned fence height and ground profile. If the ground changes height, adjust the layout according to the chosen installation method rather than forcing the mesh into an unsuitable position.
Before continuing, inspect the line of posts from several angles. Posts that lean or sit out of alignment can lead to uneven mesh, weak connections, and a poor-looking finish.
Step 5: Attach Fence Fittings and Top Rails
Fit the required post caps, rail ends, brace bands, tension bands, and other fittings according to the fencing system. The exact arrangement varies by product.
Install the top rail between the relevant posts and secure it using the specified fittings. The rail helps support the upper edge of the fence and keeps the finish line consistent.
Check that rails are properly connected and that no sharp or loose parts create a safety risk. Use the correct fittings for the post and rail sizes rather than forcing parts together.
Step 6: Attach and Stretch the Chain Link Mesh
Unroll the chain link fence fabric carefully along the fence line. Avoid dragging it across rough surfaces or handling exposed wire ends without protection.
Connect the mesh to a terminal post using the specified tension bar and tension bands. Unroll the fabric along the framework, keeping it upright and correctly positioned as you work.
Use an approved fence stretcher or tensioning tool to tighten the mesh gradually. The aim is to remove excessive slack while keeping the mesh pattern even and the posts stable. Do not pull so hard that the fabric, fittings, or posts become damaged.
Correct chain link fence mesh installation helps prevent sagging and gives the finished fence a neat, consistent appearance.
Step 7: Secure the Mesh and Check Tension
After stretching the mesh, attach it to the line posts and top rail with suitable tie wires or the specified fasteners. Follow the recommended spacing and fastening method for the fence system.
If the mesh roll must be extended, join the sections using the manufacturer’s approved method. Remove excess fabric carefully with the correct tools and secure any exposed wire ends.
Check the chain link fence tensioning across the full section. The mesh should be firm and even without excessive strain on the framework. If the fence uses a tension wire or another lower support component, install it as specified.
Step 8: Install and Adjust the Fence Gate
Position the gate according to the planned opening and fit the specified fence gate hinges and gate latch. The gate must be supported by suitable gate posts that can carry its weight and withstand repeated movement.
Open and close the gate several times. Check that it moves freely, does not drag on the ground, and closes securely. Adjust the hinges or latch as needed, following the hardware instructions.
A correctly fitted gate improves access and security. If the opening is wide or the gate is heavy, make sure the posts and foundations are designed for that load.
Step 9: Inspect the Fence and Make Final Adjustments
Walk along the complete fence line and inspect the posts, rails, mesh, fittings, and gate. Look for loose connections, uneven tension, sharp wire ends, leaning posts, and gaps that do not match the design.
Check that all fasteners are secure and that the gate works correctly. Remove leftover wire pieces and tools from the work area. Repair any damaged coating using a suitable product recommended for the fence material.
A final inspection helps identify problems before the fence is put into regular use. Keep the product details and installation records for future maintenance.
How Deep Should Chain Link Fence Posts Be?
The correct chain link fence post depth depends on fence height, post size, soil strength, wind exposure, and the foundation design. There is no single depth that is suitable for every fence.
Factors Affecting Post Depth and Hole Size
A taller fence or a fence in an exposed location may need stronger posts and deeper foundations. Soft or loose soil can also affect how well a post stays in position. Gate posts often need special attention because they carry the gate’s weight and movement.
Check the manufacturer’s installation instructions and the project’s engineering requirements before digging. Where the fence protects a large commercial or industrial site, a qualified installer should confirm the foundation design.
Concrete Footings, Drainage, and Post Alignment
Where concrete footings are specified, place the post at the correct height and keep it vertical while the concrete is installed. Allow the foundation to reach the required strength before stretching the mesh or attaching loads.
Consider drainage around the base of each post. Water that collects around foundations can weaken the surrounding ground or increase corrosion risk where protective coatings are damaged. Proper post alignment and suitable foundations help keep the fence stable over time.
How to Install Chain Link Fencing on a Slope
Installing a chain link fence on a slope requires careful planning because the ground is not level. The main goal is to keep the fence secure, follow the ground properly, and avoid large gaps underneath the mesh.
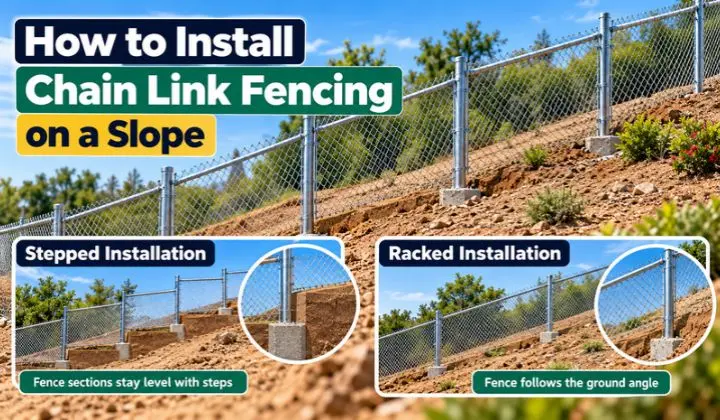
Stepped vs. Racked Installation
There are two common methods for sloping ground.
Stepped installation uses level fence sections arranged at different heights. Each section forms a step as it follows the slope. This method can work well on steep ground, but gaps may appear below the mesh if the layout is not planned correctly.
Racked installation follows the angle of the ground more closely. The rails and mesh are adjusted to match the slope where the selected fencing system allows it. This can create a smoother appearance, but not every chain link fence system supports this method.
The right choice depends on the slope, fence design, mesh flexibility, and required ground clearance. Check the manufacturer’s guidance before choosing an installation method.
Tips for Uneven Ground
Measure the change in ground height before deciding where to place the posts. Mark the fence line and check the clearance beneath each section.
Avoid forcing the mesh into position if doing so creates excessive tension or leaves weak connections. On steep slopes, retaining walls, or uneven industrial sites, ask an experienced installer to check the layout and foundation design.
Common Chain Link Fence Installation Problems and Solutions
Problems often happen when posts are poorly supported, mesh tension is uneven, or fittings are not secured correctly. Finding the cause is more effective than making repeated adjustments.
- Loose or leaning fence posts: Check the foundation, soil condition, and post specifications. A damaged or weak foundation may need professional repair.
- Sagging mesh: Inspect the tension bar, ties, and terminal connections. Retension the mesh using the approved method if the framework is sound.
- Loose fittings: Check the bands, fasteners, and rail connections. Replace damaged parts with compatible fittings.
- Gate alignment problems: Inspect the gate posts, hinges, and latch. If a post has shifted, adjusting the latch alone may not solve the issue.
- Damaged protective coating: Clean the affected area as recommended and repair it with a compatible coating product.
Regular chain link fence maintenance can help identify small problems before they affect the whole structure. If the fence continues to lean or loosen, have the foundation and overall design inspected rather than simply tightening the mesh again.
Choosing Chain Link Fence Materials for UAE Conditions
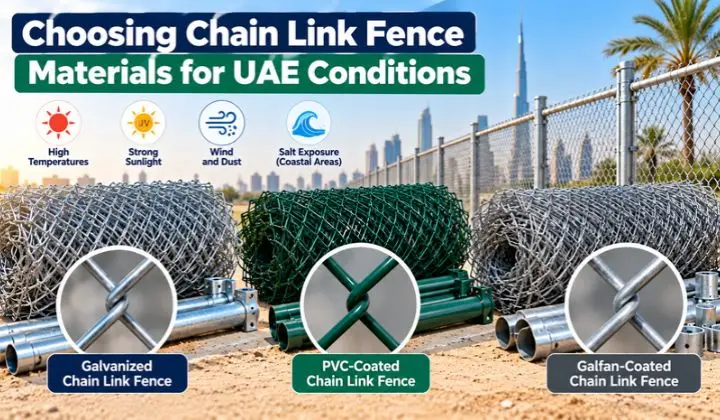
The UAE has a range of outdoor conditions, including high temperatures, strong sunlight, wind, dust, and salt exposure in coastal areas. Selecting suitable materials can help reduce corrosion and maintenance problems.
Galvanized vs. PVC-Coated Chain Link Fencing
Galvanized chain link fencing uses a zinc coating to help protect the steel wire against corrosion. It is a common option for general boundaries, gardens, and many commercial applications.
PVC-coated chain link fencing has a plastic coating over the wire. It offers a different appearance and can provide an additional protective layer when the coating is properly manufactured and maintained.
Galfan-coated fencing uses a zinc-aluminium coating that may offer improved corrosion protection compared with some conventional coatings. However, actual performance depends on the product specification and exposure conditions.
When comparing materials, check the wire diameter, mesh opening, coating type, coating thickness, post strength, and fitting quality. Do not choose a fence based on colour or price alone.
Corrosion Protection, Heat, Wind, and Coastal Conditions
In coastal locations, salt in the air can increase corrosion risk, particularly where protective coatings are damaged. Regular inspection and suitable cleaning can help keep the fence in better condition.
Wind is another important factor. A fence’s height, post spacing, foundations, and any added screening can affect the load on the structure. Privacy coverings may increase wind pressure, so the existing fence should be checked before they are added.
For commercial chain link fencing and industrial perimeter fencing, select a complete system designed for the site’s conditions. This includes the mesh, posts, foundations, rails, fittings, and gates not just the visible wire fabric.
Ask your supplier for written specifications and maintenance guidance. These details help you compare products and understand what level of performance the fencing system is designed to provide.
Chain Link Fence Installation Cost
The chain link fence installation cost depends on the amount of fencing, material quality, site conditions, and labour required. A simple fence on flat, accessible ground may cost less to install than a project with heavy gates, steep slopes, or complex foundations.
Factors That Affect Installation Costs
The main cost factors include:
- Total fence length and height
- Wire thickness, mesh opening, and coating type
- Number of gates, corners, and direction changes
- Post type and foundation requirements
- Ground conditions and slope
- Removal of old fencing and site preparation
- Labour, delivery, equipment, and finishing work
These factors influence the price to install chain link fence systems. For an accurate estimate, calculate the fence length and height first, then list the required gates, materials, and site preparation work.
Material, Labour, Gates, and Site Preparation
When comparing chain link fencing supply and installation costs, check exactly what each quotation includes. One supplier may quote only for the mesh and posts, while another may include foundations, fittings, gates, installation, and cleanup.
For projects in the UAE, request a written quotation that lists the fence specifications, total length, height, coating, gate details, foundation method, and any excluded work. This makes it easier to compare offers fairly.
If you are looking for chain link fence installation UAE, chain link fence Dubai, or chain link fence installation Abu Dhabi, compare suppliers based on their experience with similar projects, material specifications, and installation scope. Confirm whether they can provide the required technical details and warranty terms.
Do not rely on a generic price per metre without checking the scope of work. Site access, soil conditions, gate design, and the selected fencing system can all change the final cost.
DIY Installation vs. Hiring a Professional
A small fence on level ground may be suitable for an experienced DIY installer with the right tools. However, installing posts, setting foundations, stretching mesh, and fitting gates all require accurate measurements and safe handling.
Hiring a professional may be more suitable for tall fences, heavy gates, sloping sites, large commercial areas, and industrial projects. An experienced installer can help assess the site, select suitable materials, and follow the manufacturer’s installation requirements.
When comparing chain link fence installation companies, check previous project experience, the materials being offered, the work included in the quotation, and the warranty conditions. The cheapest quote may not provide the best value if important components or installation work are excluded.
Chain Link Fence Installation Checklist
Use this checklist before accepting the finished installation.
- Property boundaries and fence measurements have been confirmed.
- The fence height, mesh type, and coating match the project requirements.
- Post spacing and foundations follow the approved design.
- Posts are aligned and properly supported.
- Top rails, fittings, and mesh connections are secure.
- Mesh tension is even, with no obvious sagging.
- Gates open, close, and latch correctly.
- Sharp wire ends and leftover materials have been removed.
- Damaged coatings and visible installation defects have been checked.
- Product details and maintenance instructions are available.
A final inspection helps identify problems before the fence is used regularly. Keep the supplier’s documentation so you can check the material specifications and maintenance requirements later.
Frequently Asked Questions
How Do You Join Two Rolls of Chain Link Fence Mesh?
Two mesh sections are commonly joined by connecting the woven wire strands using the method approved for the fencing system. The finished joint should follow the surrounding mesh pattern and remain secure after the fabric is stretched.
Use suitable tools and protective gloves, and secure any exposed wire ends. Check the joint before completing the installation to make sure it does not create a weak or uneven section.
What Should You Check Before Digging Fence Post Holes?
Confirm the fence boundary, mark the planned post positions, and arrange to identify underground cables, pipes, and other buried services. Check the soil and the foundation requirements before starting to dig.
You should also confirm any site permissions or project requirements that apply. These checks help reduce safety risks, prevent damage to buried services, and avoid having to move incorrectly placed posts.
Can You Add Privacy Slats to an Existing Chain Link Fence?
Privacy slats may fit some chain link fences, depending on the mesh size, fence height, and slat design. However, they can increase wind pressure on the mesh, posts, rails, and foundations.
Before adding them, check the manufacturer’s guidance and confirm that the existing fence can support the extra load. A fence designed for open mesh may need strengthening or a different screening solution.
Why Does Chain Link Fence Mesh Become Loose After Installation?
Mesh can become loose because of incorrect tensioning, weak terminal posts, loose fittings, or movement in the foundations. Poor connections or damaged components can also cause uneven sections.
Inspect the posts, tension bar, bands, ties, and foundations before making adjustments. Simply pulling the mesh tighter will not solve the problem if the posts or supporting structure are unstable.
How Should You Maintain Chain Link Fencing in Coastal UAE Areas?
Inspect the fence regularly for damaged coatings, corrosion, loose fittings, and movement around the posts. Where appropriate, remove accumulated dust and salt deposits using a cleaning method recommended for the fence material.
Repair damaged protective coatings promptly and replace badly corroded components when needed. The right maintenance schedule depends on the site’s exposure, material specifications, and the manufacturer’s recommendations.
Get Professional Chain Link Fence Installation in the UAE
A reliable fence starts with careful planning and suitable materials. Correct post installation, even mesh tension, secure fittings, and properly aligned gates all help create a stable and neat result.
For residential, commercial, or industrial projects, Vertex Fence can be a starting point for discussing your fencing requirements. Prepare the approximate fence length, required height, site location, gate details, and any special security needs before requesting a quotation.
Ask for a written proposal that explains the materials, installation scope, foundation requirements, and warranty conditions. Comparing these details will help you choose a fencing solution that suits your site and project needs.