How to Install Chain Link Fence: Step-by-Step Complete Guide

A chain link fence is one of the most affordable and durable fencing options for homes, businesses, warehouses, schools, and industrial sites. It provides security, defines property boundaries, and requires very little maintenance compared to many other fencing systems.
If you are searching for how to install chain link fence, this guide will walk you through the complete process in simple steps. You will learn how to prepare the site, set posts, install rails, attach the mesh, and avoid the mistakes that often cause fences to sag or fail over time.
Many homeowners start a fencing project without understanding proper fence layout, post spacing, or concrete footing requirements. As a result, the fence may become uneven, unstable, or difficult to maintain. This guide focuses on practical installation advice that helps you achieve professional-quality results.
Tools and Materials Needed for Chain Link Fence Installation
Having the right equipment before starting will save time and reduce installation mistakes.
Essential Tools
You will need:
- Post Hole Digger
- Auger
- Measuring Tape
- String Line
- Spirit Level
- Socket Wrench
- Fence Stretcher
- Come Along Winch
- Pliers
- Shovel
- Rubber Mallet
These tools help create accurate measurements and maintain proper fence alignment throughout the project.
Required Materials
Gather the following materials before installation:
- Chain Link Mesh
- Fence Fabric
- Terminal Posts
- Line Posts
- Corner Posts
- Gate Posts
- Top Rail
- Tension Wire
- Tension Bar
- Tension Bands
- Brace Bands
- Fence Ties
- Post Caps
- Gate Hardware
- Concrete
- Gravel
- Galvanized Steel components
If your property is located in a coastal or humid environment, consider using PVC Coated Chain Link Fence materials for added Corrosion Resistance.
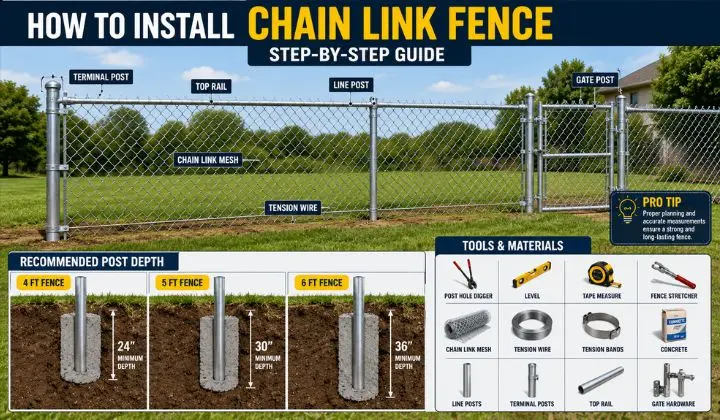
Understanding Chain Link Fence Components
Before installing a fence, it is important to understand how the main parts work together.
Terminal Posts, Line Posts, and Corner Posts
Terminal Posts provide structural support at the beginning and end of a fence run.
Corner Posts are installed where the fence changes direction.
Line Posts are placed between terminal posts and support the fence along its length.
Without properly installed posts, the fence cannot maintain correct tension or long-term stability.
Top Rail, Tension Wire, and Tension Bars
The Top Rail runs horizontally across the top of the fence and helps maintain a straight fence line.
A Tension Wire is usually installed near the bottom of the fence. It prevents sagging and improves Fence Stability.
The Tension Bar is woven through the end of the mesh and connected to tension bands. This helps keep the fence fabric tight and secure.
Fence Fabric, Ties, and Gate Hardware
The Fence Fabric is the woven metal mesh that forms the main barrier.
Fence Ties connect the fabric to the posts and rails.
Gate Hardware includes hinges, latches, and mounting components that allow gates to open and close smoothly.
Chain Link Fence Installation Diagram Explained
Many people search for a chain link fence installation diagram before starting their project because it helps them understand how every component connects together.
A typical chain link fence structure includes:
- Terminal Posts at both ends
- Line Posts positioned between them
- A continuous Top Rail
- Fence Fabric attached to the framework
- Tension Bars
- Tension Bands
- Fence Ties
- Tension Wire along the bottom
- Optional gates and accessories
Think of the posts as the skeleton of the fence and the mesh as the protective covering. If the framework is installed correctly, the rest of the installation becomes much easier.
Planning Your Chain Link Fence Installation
Good planning is one of the most overlooked parts of chain link fence installation.
A few extra minutes spent planning can save hours of repair work later.
Check Property Lines and Local Regulations
Before digging any holes:
- Confirm property boundaries
- Check local building regulations
- Verify permit requirements
- Identify underground utility lines
Installing a fence in the wrong location can lead to expensive disputes and rework.
Always call utility marking services before excavation begins.
Measure and Mark the Fence Layout
Use a Measuring Tape and String Line to mark the complete fence route.
Mark:
- Corner locations
- Gate locations
- End points
- Post positions
A straight and accurate Fence Layout is essential for a professional-looking result.
Determine Fence Height and Post Spacing
Most residential chain link fences are:
- 4 feet high
- 5 feet high
- 6 feet high
For most projects, Fence Post Spacing should be between 8 and 10 feet.
Proper spacing improves Fence Durability and prevents unnecessary stress on the framework.
How to Install a Chain Link Fence Step by Step
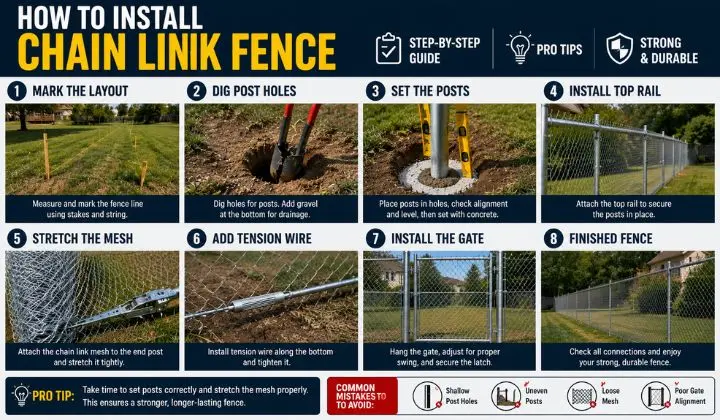
Step 1 – Mark the Fence Line
Once planning is complete, mark the entire fence route using stakes and string.
Double-check all measurements before digging.
A common mistake is assuming measurements are correct without verification. Even a small alignment error can create problems when installing gates or stretching the mesh.
Pro Tip
Walk the entire fence route and inspect the ground for:
- Tree roots
- Drainage issues
- Slopes
- Existing structures
Identifying obstacles early helps avoid delays during installation.
Step 2 – Dig Post Holes and Prepare Footings
Next, dig holes for all fence posts.
As a general rule:
- Hole width should be approximately three times the post diameter.
- Hole depth should be about one-third of the post length.
Add several inches of Gravel to the bottom of each hole.
This improves drainage and reduces moisture buildup around the post base.
Proper Concrete Footing preparation plays a major role in long-term Fence Stability.
Pro Tip
If your soil is loose or sandy, increase the hole depth slightly to provide additional support.
This simple adjustment can significantly improve the strength of the finished fence.
Step 3 – Set Terminal Posts and Line Posts
Start by installing the Terminal Posts, Corner Posts, and Gate Posts.
These posts carry most of the load created when the fence is stretched.
Place each post in the hole and use a Spirit Level to ensure it remains perfectly vertical.
Fill the hole with Concrete and check alignment several times while the concrete is setting.
Allow sufficient curing time before continuing.
Once the terminal posts are secure, install the Line Posts according to your planned spacing.
Pro Tip
Many DIY installers rush this step.
However, taking extra time to align the posts correctly will make the rest of the installation process much easier.
Step 4 – Install Post Hardware and Top Rails
After the posts have cured, install all required hardware.
This includes:
- Tension Bands
- Brace Bands
- Post Caps
- Rail fittings
Next, slide the Top Rail through the line post caps and connect it between the terminal posts.
The top rail helps maintain a straight Fence Structure and provides additional support for the mesh.
Check all hardware connections and tighten them securely.
Pro Tip
Improperly positioned tension bands are one of the most common causes of loose Fence Fabric later in the installation process.
Make sure every band is correctly aligned before moving to the next step.
Step 5 – Attach and Stretch the Chain Link Fabric
Now it is time to install the Chain Link Mesh.
Unroll the Fence Fabric along the fence line and keep it flat on the ground. Insert a Tension Bar through the first row of mesh and secure it to the Terminal Posts using Tension Bands.
Once one end is secured, use a Fence Stretcher or Come Along Winch to pull the fabric tight.
A properly stretched fence should feel firm but should not distort the diamond pattern of the Welded mesh fence.
Pro Tip
Many people over-tighten the mesh. This can damage the Fence Fabric and place unnecessary pressure on the Fence Posts.
A tight fence should look straight without changing the shape of the mesh openings.
Step 6 – Install Tension Wire and Secure the Mesh
After stretching the fabric, install the Tension Wire along the bottom of the fence.
This wire helps improve Fence Stability and prevents the mesh from lifting or sagging over time.
Attach the wire to the end posts and pull it tight.
Next, use Fence Ties to secure the mesh to the Top Rail and Line Posts.
Recommended spacing:
- Every 12–16 inches on posts
- Every 24 inches on the rail
This creates a stronger and more durable Fence System.
Step 7 – Install the Chain Link Fence Gate
Many homeowners ask how to install chain link fence gate correctly because gate problems are one of the most common fence issues.
Install hinges on the Gate Posts and attach the gate frame according to the manufacturer’s instructions.
Check that:
- The gate swings freely
- The latch aligns properly
- The gate remains level
- There is enough ground clearance
Poor gate alignment can place stress on the posts and cause long-term performance issues.
Pro Tip
Before fully tightening the hardware, open and close the gate several times to confirm smooth operation.
How Deep Should Chain Link Fence Posts Be?
One of the most common questions is:
“What is the correct 4 foot chain link fence post depth?“
For most residential installations:
- 4-foot fence = 24 inches minimum depth
- 5-foot fence = 24–30 inches depth
- 6-foot fence = 30–36 inches depth
However, depth depends on:
- Soil Conditions
- Local building codes
- Wind exposure
- Fence height
If the fence is installed in loose or sandy soil, deeper Concrete Footings may be necessary.
A strong foundation is critical for long-term Fence Durability and Wind Resistance.
Installing Chain Link Fences in Different Conditions
How to Install Chain Link Fence on Uneven Ground
Installing a fence on a slope requires additional planning.
There are two common methods:
Stepped Method
Each section follows a stair-step pattern.
Best for:
- Steep slopes
- Residential properties
Racked Method
The mesh follows the natural contour of the land.
Best for:
- Gentle slopes
- Better appearance
When working on uneven ground, keep the bottom of the fence as close to the surface as possible to prevent gaps.
Proper Fence Alignment is especially important on sloped terrain.
How to Install Chain Link Fence with T Posts
Many farms and temporary fencing projects use T-posts instead of traditional metal posts.
The process is similar:
- Mark the fence line
- Drive T-posts into the ground
- Maintain consistent spacing
- Attach the Chain Link Mesh
- Secure using clips or wire ties
T-post installations are often faster and less expensive than full Chain Link Fence Installation systems.
However, they are usually better suited for agricultural applications rather than high-security projects.
How to Install Chain Link Fence with Concrete Posts
Some commercial projects use concrete posts instead of steel posts.
The process includes:
- Digging deeper foundations
- Installing reinforced concrete posts
- Allowing proper curing time
- Attaching mesh using suitable hardware
Concrete posts offer excellent Corrosion Resistance and long-term Fence Stability.
They are often used in industrial and high-security environments.
Common Chain Link Fence Installation Mistakes to Avoid
Even experienced DIY installers make mistakes.
Avoiding the following issues can save time and money.
Incorrect Fence Post Spacing
Posts placed too far apart can cause the mesh to sag.
Always follow recommended Fence Post Spacing guidelines.
Poor Concrete Curing
Installing rails and mesh before concrete cures can cause movement and misalignment.
Weak Fence Tension
Improper stretching reduces the strength of the entire Fence Structure.
Uneven Fence Alignment
Always use a String Line and Spirit Level during installation.
Poor Drainage Around Posts
Water accumulation can weaken foundations over time.
Good drainage helps improve Fence Lifespan.
Chain Link Fence Installation Cost Factors
Many homeowners want to know the real cost before starting a project.
Several factors affect Chain Link Fence Cost.
Fence Height
Taller fences require:
- More materials
- Larger posts
- Additional labor
Fence Length
Longer fence runs naturally increase project costs.
Mesh Gauge
Heavier Galvanized Steel mesh costs more but provides better security and durability.
Gates and Accessories
Adding:
- Gates
- Privacy slats
- Security features
will increase the overall budget.
DIY vs Labor Costs
DIY projects reduce labor expenses.
Professional installation offers faster completion and fewer mistakes.
DIY vs Professional Chain Link Fence Installation
When DIY Makes Sense
DIY installation may be suitable when:
- The fence is short
- The ground is level
- You already own the tools
- You have basic construction experience
For simple projects, DIY can save money.
When Hiring Professionals Is the Better Option
Professional installation is usually the better choice when:
- The project is large
- The site has slopes
- Security requirements are high
- Time is limited
Companies such as Vertex Fence often handle complex residential, commercial, and industrial fencing projects more efficiently than a typical DIY installation.
A professional team can also help ensure proper Fence Layout, Concrete Footing, and long-term Fence Durability.
Frequently Asked Questions
Can You Install a Chain Link Fence Without Posts?
No. A chain link fence requires structural support from Terminal Posts and Line Posts. Without posts, the mesh cannot maintain tension and will eventually collapse.
Do Chain Link Fence Posts Need Concrete?
In most residential and commercial projects, yes. Concrete Footings improve stability, especially in areas with soft soil or strong winds.
How Long Does It Take to Install a Chain Link Fence?
Most residential projects take one to two days. Larger properties or difficult terrain may require additional time for excavation and post curing.
How Much Does It Cost to Install a Chain Link Fence?
The total cost depends on fence height, length, mesh gauge, gates, and labor. DIY projects are usually cheaper, while professional installation provides convenience and expertise.
What Is the Best Gauge for Chain Link Fencing?
For most residential properties, 11.5-gauge mesh offers a good balance between strength and affordability. Commercial applications may require heavier gauges.
Where Can I Find a Chain Link Fence Installation Guide PDF?
Many manufacturers provide downloadable guides. However, a complete online guide is often more useful because it includes updated installation methods, safety tips, and practical advice.
Final Thoughts
Learning how to install chain link fence is not difficult when you follow the correct process. Success starts with a proper Fence Layout, accurate measurements, strong Concrete Footings, and correctly installed Terminal Posts, Line Posts, and Top Rail components.
Whether you choose a standard Galvanized Chain Link Fence, a PVC Coated Chain Link Fence, or a custom Security Fencing solution, the key is to build a strong framework before attaching the mesh.
If your project involves slopes, large areas, or commercial security requirements, professional support from experienced contractors such as Vertex Fence can help ensure long-term performance and reliability.With proper planning, installation, and maintenance, a quality Chain Link Fence Installation can provide security, durability, and value for many years.